
The moment you receive a goshuin, the instinct to photograph it kicks in.
You’ve just received something worth keeping — a stamp written in ink by hand, pressed in vermillion, at a shrine or temple that may be far from home. The impulse to photograph it is natural. But the way you shoot it makes all the difference between a photo that captures the experience and one that just technically documents a thing.
The most common result: the stamp washes out in a flash of white. The ink script blurs in motion. The background is a parking lot or a hotel ceiling. None of these things matter in the moment — but they do matter later, when you try to recall what it felt like to stand in that precinct.
The good news is that none of this requires special equipment. A smartphone camera, a few minutes, and an understanding of what makes goshuin difficult to shoot — that’s enough to take photos that hold the memory in place. This guide covers five techniques that make a measurable difference.
Whether you’re logging stamps digitally in an app, building a physical collection in a goshuincho, or both, these techniques are universally applicable. They’re not about making your photos look impressive on social media. They’re about making them useful as records — years from now, when you open a gallery of shrine stamps and want to know exactly where you were and what you felt.
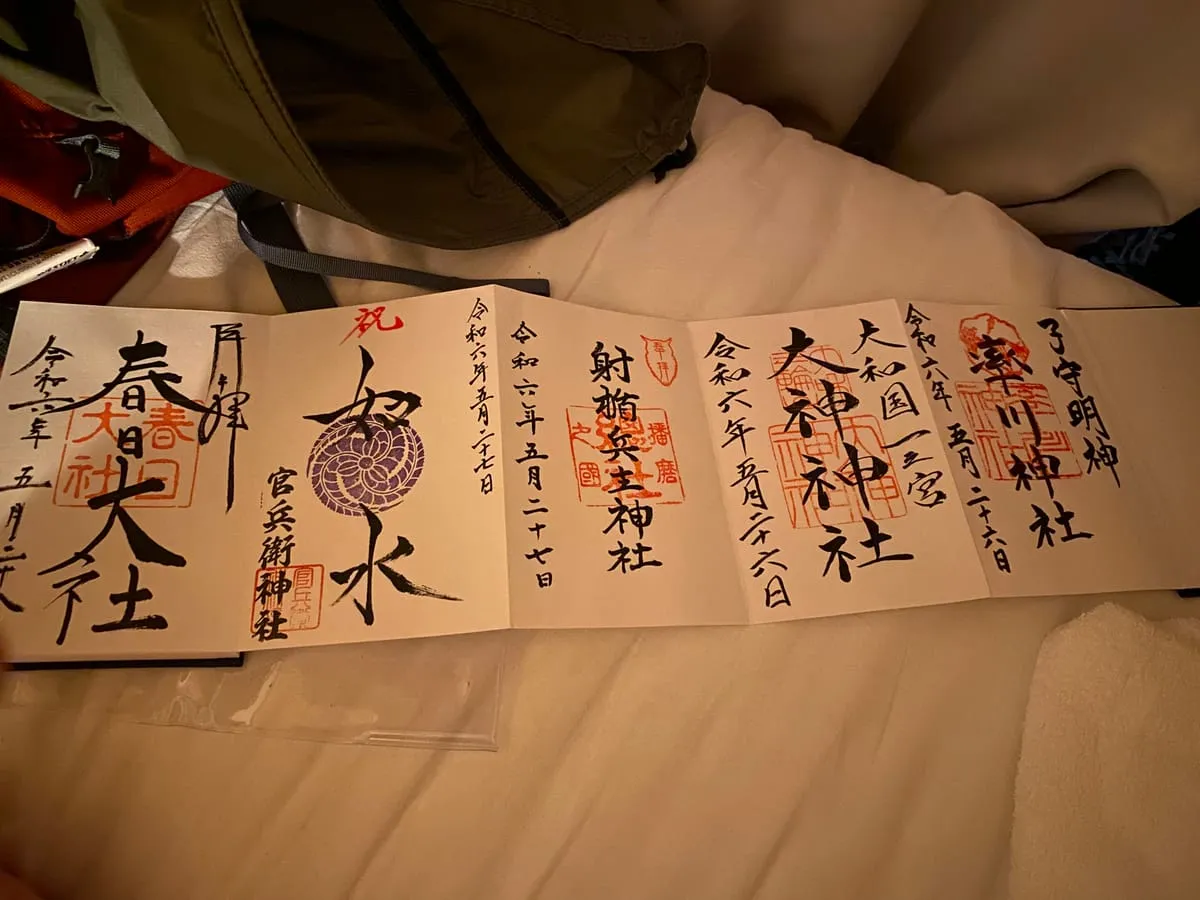
Technique 1 | Use Natural Light, Not Flash
The single most common mistake in goshuin photography is using the flash.
Vermillion ink on white washi paper looks vivid to the eye — exactly the combination that overexposes when hit with artificial light. A camera flash aimed directly at a red stamp will blow out the center: the bright red you’re trying to capture becomes a washed-out pink or white. The ink calligraphy suffers too — black script hit with direct flash loses its depth and three-dimensionality, flattening into something that looks printed rather than written.
Natural light — specifically diffused daylight — is what goshuin photography needs.
Why diffused light works. The best light source for this kind of photography is not bright sun, but rather the soft, even light you get on an overcast day, in shade, or near a window. Diffused light comes from many directions simultaneously, which means no harsh shadows and no overexposed spots. It shows the texture of ink on paper, the subtlety of how the stamp impressed the washi fibers, and the variation in brush pressure that makes hand-written calligraphy different from print.
Avoid direct sunlight. Strong midday sun creates the same problem as flash — too much contrast, with bright paper areas blowing out. If you’re shooting outdoors on a sunny day, move into the shade of a tree, wall, or building overhang before shooting. The underside of a shrine gate or the eaves of the main hall are ideal spots — you get outdoor light without direct glare.
Overcast days are ideal. The cloud cover acts as a natural softbox, spreading light across the sky and eliminating harsh shadows. Many photographers of Japanese objects — lacquerware, ceramics, printed textiles — prefer cloudy-day light for exactly this reason. A goshuin on a cloudy day often photographs better than the same stamp in bright sunshine.
Indoors: use a window. If you’re shooting back at the hotel or at home, find a window with indirect daylight — not the beam of direct sun through the glass, but the ambient light that fills the room. Position the goshuincho perpendicular to the window, not directly in front of it, so the light falls across the paper at an angle. This side-lighting reveals texture and depth in the ink.
Settings to adjust. Turn flash off permanently for goshuin shoots — many phones default to auto-flash which fires in dim conditions. Look for the HDR (High Dynamic Range) setting and enable it: HDR blends multiple exposures to preserve both the bright whites and the dark ink, which is exactly the challenge goshuin presents. Some newer phones handle this automatically with computational photography, but knowing the setting exists lets you confirm it’s working.
Multi-lens phones: the wide-angle lens introduces more geometric distortion than the standard lens. For goshuin photography, prefer the standard focal length — stay further back rather than shooting on the ultra-wide.
Technique 2 | Lay It Flat and Shoot from Directly Above
Holding a goshuincho in one hand and shooting with the other is the most common shooting position — and the one most likely to produce a blurry, distorted result.
The fix is simple: place the goshuincho on a flat surface, then shoot from directly overhead.
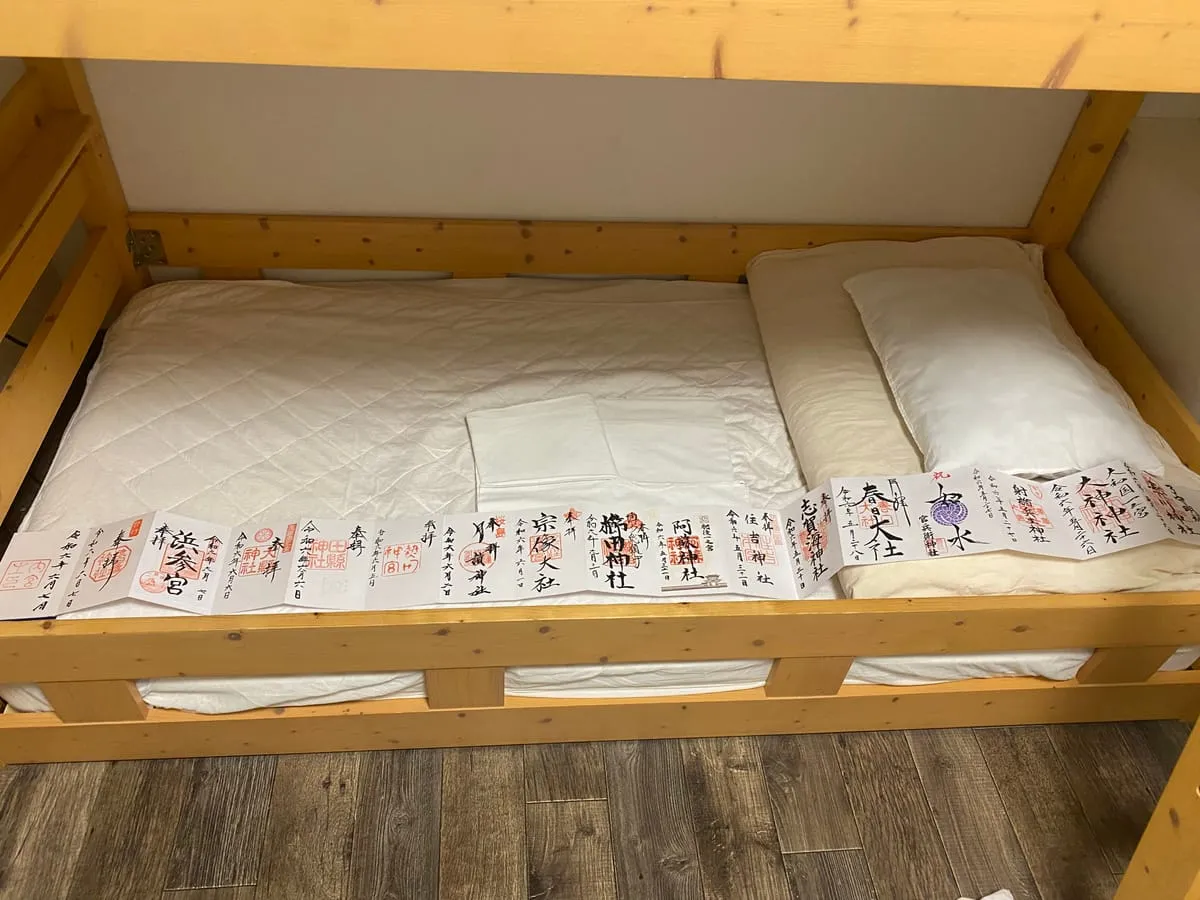
This solves three problems simultaneously. It eliminates camera shake, because you’re not holding a camera one-handed. It removes perspective distortion, because shooting straight down gives you a flat, undistorted view of the page. And it frees your other hand to make minor adjustments — moving the book slightly, adjusting the opening angle — without the phone moving.
Where to place the goshuincho at shrines and temples. Stone pavement (sekidan) is the classic choice — it’s flat, stable, and texturally interesting without overwhelming the stamp. The wooden floor of a veranda, the edge of a stone lantern base, the stone surrounding a water basin — all work. The texture of the surface becomes part of the photograph in a way that adds context without distracting.
Back at your lodgings or home: any flat surface works. A wooden table, a tatami mat, a light-colored blanket or sheet. Avoid glass tabletops that create reflections. Avoid dark surfaces that increase the contrast too dramatically. A neutral, slightly textured surface — wood grain, fabric weave — tends to work better than bare white.
Shooting from overhead: the mechanics. Hold the phone directly above the goshuincho, with the camera pointing straight down. Most phones have a grid overlay available in camera settings — turn it on. The grid lines tell you when the phone is genuinely level and when it’s slightly tilted. Align the edges of the goshuincho with the grid before shooting.
For people who struggle with holding the phone steady overhead: use the self-timer. Set a two-second delay, hold the phone in position, press the shutter, and keep still. The two-second gap eliminates the vibration from pressing the button.
Full spread or single page. A full spread shot — both pages open simultaneously — gives you the context of the entire opening. Use it when multiple stamps appear together, when the spread has a designed relationship between left and right pages, or when you want to capture the scale of the book. Single-page shots give you more resolution on a specific stamp and allow closer framing when that’s what the image needs. Shoot both when you’re unsure and choose later.
The spine shadow problem. When shooting a bound goshuincho fully open, the binding creates a shadow in the gutter between pages. To minimize it: open the book as flat as possible, use a lateral light source (from the side rather than directly above), or if the book allows it, press gently on both pages from above to flatten the spread. For accordion-fold orihon style goshuincho, this problem largely disappears since the whole thing lies flat.
Technique 3 | Shoot While You’re Still There
The right time to photograph a goshuin is immediately after receiving it — before you leave the precinct.
The reason is memory encoding. The moment you step out of the stamp office, you’re still at that specific shrine or temple. The visual details of the precinct are in front of you. Your memory of receiving the stamp is fresh. A photograph taken in that moment captures something more than the stamp — it captures the present-tense quality of being there. Later, viewing that photograph retrieves more of the context than a photo taken at home, even if the technical quality is identical.
The practical reason is equally important: keeping up with your records is far easier in the moment than catching up weeks later. If you leave multiple shrines unrecorded and try to go back and photograph them simultaneously, you’ll find yourself unable to match stamps to locations. Shrine names are often written in the goshuin itself, but handwriting varies and some stamps include only a date or a deity name rather than a place name. The gap is harder to bridge than it appears.
A practical workflow at the shrine. Receive the goshuin → thank the staff → step aside to an appropriate location (stone pavement, the veranda) → lay the goshuincho flat → photograph → log in the app before moving to the next location. This becomes second nature after a few visits. It’s slower the first few times, but it compresses into a few minutes that consistently produce complete records.
Wet ink: a brief pause. Freshly-written goshuin are sometimes still wet when you receive them. The staff at the stamp office usually wait for the ink to dry before handing back the goshuincho, but occasionally the base ink is dry while a top layer remains tacky. Close the book prematurely and you may transfer ink to the facing page — a small disaster in a book you’re accumulating over years. Using the photographic pause as a drying pause serves double purpose: by the time you’ve photographed from overhead, adjusted composition, and shot a second angle, the ink is usually stable.
Etiquette. Don’t shoot from inside or immediately in front of the stamp window — you’ll block other visitors. Step fifteen or twenty meters away, to a secondary location in the precinct that isn’t actively in use. For very popular shrines where space is at a premium, the approach path or a side garden often has space for a brief photography stop.
App integration. If you’re using a goshuin tracking app, the stamp-and-photograph session becomes the registration moment. The app ties the photograph to the shrine record, date, and GPS location. Later, when you’re viewing your collection on a map — all the places you’ve visited rendered as points across a geography — the photographs appear attached to their specific locations. This is what makes digital records genuinely useful rather than just backed-up copies of physical ones.
Technique 4 | Use Background and Composition to Preserve the Atmosphere
Recording the stamp accurately is one goal. Preserving the experience of receiving it is another — and they’re not mutually exclusive.
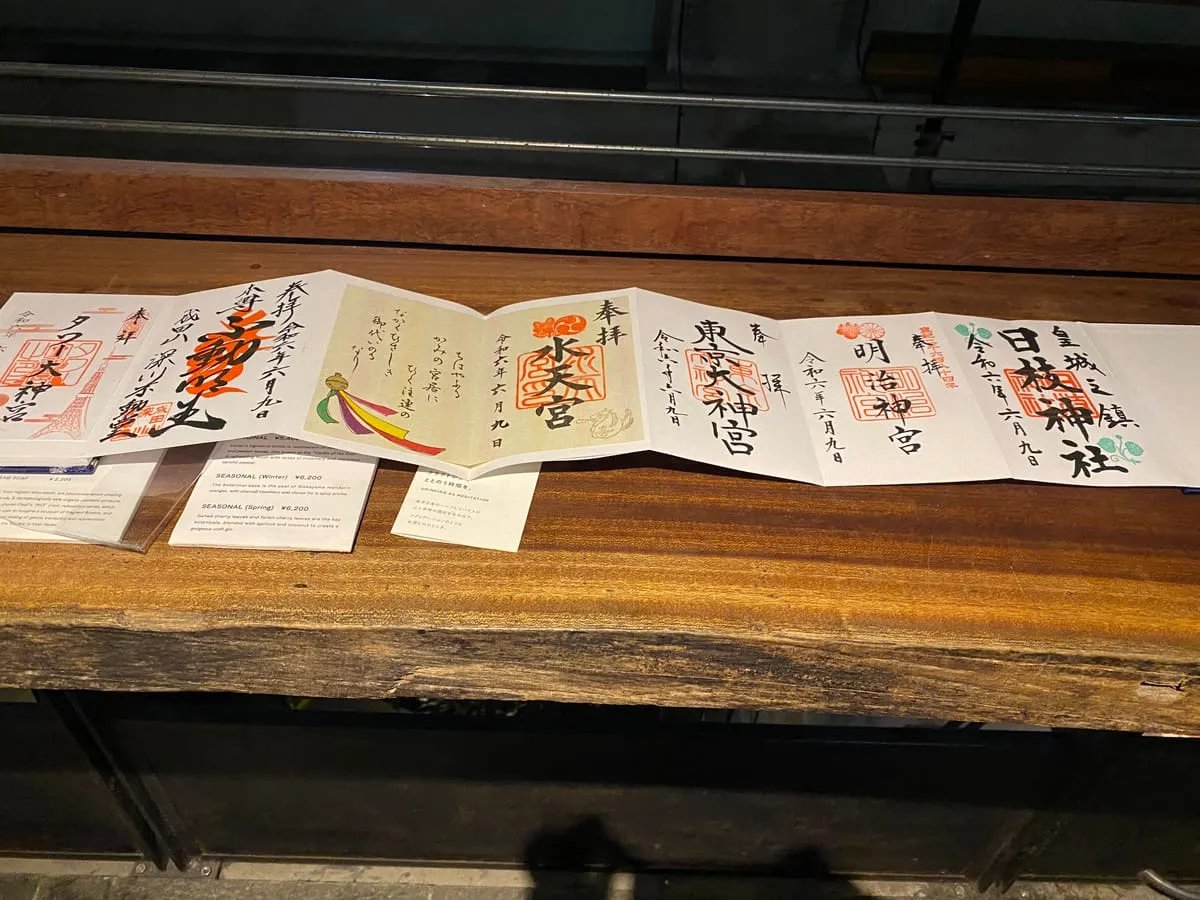
A photograph taken on stone pavement at Meiji Shrine reads differently from the same goshuincho photographed on a plastic table later. The difference isn’t the technical quality of the stamp reproduction — it’s whether the surroundings connect the image to the place. When the background has texture and context, the photograph carries spatial memory. When it’s abstracted away, it doesn’t.
What makes a good background. Stone, wood, moss, gravel — the surfaces of shrine precincts. These materials have textures that photograph well with natural light and provide warm neutrals that complement the red of vermillion stamps and the off-white of washi paper. The worn smoothness of centuries-old stone, the irregularity of gravel, the grain of aged wooden veranda boards — any of these becomes a supporting character in the photograph without stealing focus from the stamp itself.
Seasonal indicators. Use the environment to date the photograph beyond just the metadata. Spring: fallen cherry blossom petals on stone. Summer: the crisp shadow of a water basin. Autumn: a fallen ginkgo leaf positioned in a corner of the frame. Winter: frost on stone, or the muted tones of bare branches in the background. These elements do what timestamps cannot — they communicate the sensory quality of the season, not just the calendar date.
Props and additions. If you’re carrying an omamori (amulet) or ema (votive plaque) from the same shrine, photographing them alongside the goshuincho creates a richer composition. Keep the goshuincho as the dominant element — the added objects should occupy secondary positions. Avoid cluttering the frame. A single small object beside the book tends to be more effective than multiple items.
Portrait or landscape orientation. Most goshuincho are taller than they are wide, making portrait orientation the natural fit for full-book shots. For spread shots showing both pages, landscape orientation often captures the full spread without awkward cropping. The aspect ratio of the phone screen doesn’t need to dictate the composition — if one orientation obviously suits the material, use it.
Getting close for detail shots. The broad composition captures the goshuincho as an object in its context. Detail shots capture the calligraphy as artistry. Skilled priests and shrine staff write their goshuin with practiced brushstrokes — the variation in ink pressure, the flow of the characters, the way specific strokes taper — these are details worth recording. Get close enough that the individual brushwork fills the frame. Most modern smartphone cameras handle this well; if your phone has a dedicated macro or close-focus mode, use it.
The key: do not use digital zoom for close-up shots. Digital zoom is software-based magnification and degrades image quality. Move the phone physically closer to the page. If your phone has multiple cameras, check which engages at what zoom level — on many phones, the 1× to 1.5× range uses the standard camera without digital zoom; going beyond triggers either the telephoto lens (good) or digital zoom (bad).
Technique 5 | Adjust Brightness and Color After Shooting
The photo you get straight out of the camera is rarely the final image. This isn’t a failure of the camera — it’s the nature of automatic exposure systems trying to solve a genuinely difficult problem.
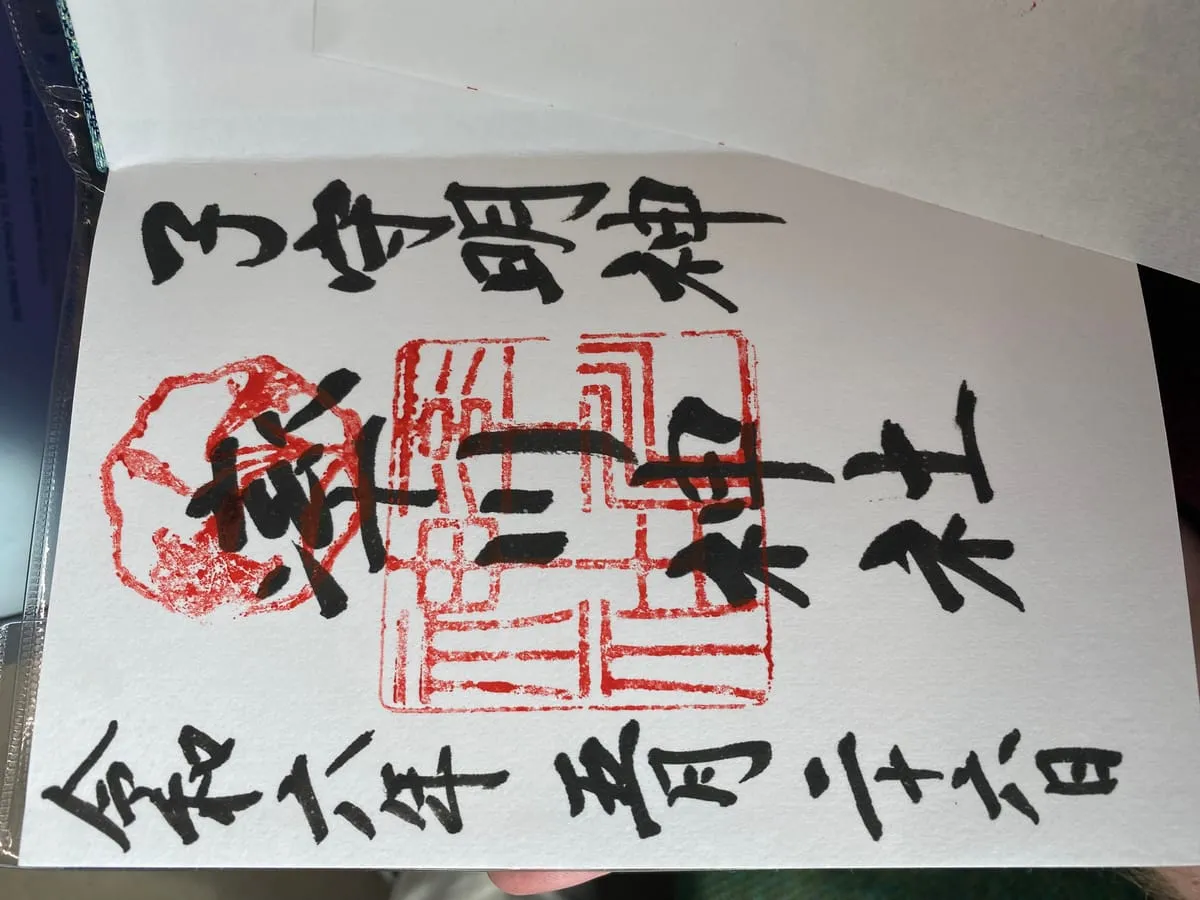
A goshuin on white washi is high-contrast: very bright areas (the paper) and very dark areas (the ink) exist in the same frame. Automatic exposure typically splits the difference, which means the paper looks slightly gray rather than white, and the ink detail shows but lacks punch. Or the exposure favors the bright paper and the ink characters lose definition.
Post-processing is about correcting this — bringing the photograph back to how the stamp actually looked. Not about making it look better than the original, but about undoing what the camera’s assumptions got wrong.
Brightness and exposure. The first adjustment is usually increasing exposure until the washi paper reads as bright white. The reference point: look at the blank areas of the page — the margins around the stamp, the empty spaces between columns of text. Raise exposure until those areas are white but not glowing. Stop before the finest calligraphy strokes disappear. This is the calibration.
In apps with separate controls (Lightroom Mobile, Snapseed): adjust Exposure for overall brightness, then pull Highlights back down to recover any areas that overexposed during the raise. This combination — raise exposure, pull highlights — is the single most useful adjustment for goshuin photography.
Contrast and shadow depth. Increasing contrast slightly can make ink calligraphy read more clearly against the paper. The risk: if you go too far, the vermillion stamp becomes muddy and the gradations in ink pressure disappear. Add contrast carefully — a little is effective, a lot becomes heavy-handed. The Shadows slider (in Lightroom: Shadows; in iOS Photos: Shadows) controls the darker areas independently. Lowering shadows makes the ink darker while leaving the bright paper areas relatively unchanged.
Color correction: white balance. If you shot in artificial light — the overhead lighting of the stamp office, room lighting at your lodgings — the paper will have a color cast. Fluorescent light tends toward green-yellow. Warm incandescent or LED light toward orange. The fix is white balance correction. In Lightroom, the White Balance Selector eyedropper tool does this automatically: tap the blank white area of the paper and it adjusts the color temperature to neutralize the cast. In most other apps, manually adjust the temperature slider until the paper looks white.
Saturation and vibrance. The vermillion stamp (shuin) should appear as the warm, saturated red it is in person. Some shooting conditions desaturate it slightly. A small increase in Saturation or Vibrance can restore this. Vibrance (available in Lightroom and some others) is gentler than Saturation — it boosts less-saturated colors without pushing already-saturated ones further. For goshuin with the vivid red stamps, this is often the right tool.
When to stop editing. The target is the real stamp. If someone who has seen your goshuincho in person looks at the photograph and says “yes, that’s what it looks like,” the editing is done. If the paper looks blue-white rather than natural white, you’ve overcorrected white balance. If the stamp looks artificially fluorescent, saturation went too far. Use the original photograph and a real-world reference — ideally the actual goshuincho — to calibrate your eyes while editing.
Tools. The built-in Photos app on iOS handles the basics — exposure, brilliance, contrast, white balance — without installing anything else. Lightroom Mobile (free tier) adds non-destructive editing (edits can be undone at any point, with the original preserved) and more precise controls. Snapseed is fast and intuitive, better for quick adjustments than precision work. Any of these is sufficient.
Common Mistakes and How to Fix Them
The stamp is washed out in the center
Cause: Flash fired directly onto the red stamp. Even moderate flash will overexpose saturated vermillion.
Fix: Shoot in natural light with flash off. If you must shoot indoors in dim conditions, place the goshuincho near a window rather than using the flash. In post-processing, you can partially recover an overexposed stamp by pulling Highlights and Whites down, but serious flash overexposure can’t be fully corrected.
The image is blurry
Cause: Camera shake from one-handed shooting, or the shutter speed slowed in low-light conditions.
Fix: Place the goshuincho on a flat surface and hold the phone with both hands. In very dim conditions, the camera will use a slow shutter to compensate — even a small hand movement will blur. Use the self-timer (2 seconds) to eliminate the vibration of pressing the shutter button. Or prop the phone on a stable surface for the shot.
The page looks distorted or trapezoidal
Cause: The camera isn’t directly above the page — it’s at an angle, causing perspective distortion.
Fix: Position the phone directly over the center of the page, camera pointing straight down. Check with the grid overlay. If slight distortion remains after shooting, most editing apps have a perspective or geometry correction tool that can straighten it in post-processing — but this always degrades resolution slightly, so getting it right in-camera is better.
The background is distracting
Cause: The photo was taken quickly without attention to what’s behind the goshuincho.
Fix: Before shooting, spend five seconds surveying the area for a flat surface with appropriate texture and color. At worst, move the goshuincho to a stone step or wooden surface nearby. A quick background choice at shoot time is much simpler than trying to blur or remove backgrounds in post-processing.
The stamp photos can’t be matched to a location later
Cause: Multiple stamps photographed without records, or GPS was disabled.
Fix: Log each stamp in the app immediately after photographing — before moving to the next shrine. The app binds the photograph to the shrine name, date, and location in a single registration. Without this step, you’re relying on memory and photograph timestamps, which is workable but fragile. If your phone has GPS disabled, re-enable it at least while traveling between shrines so photograph timestamps correlate with location history.
The Function of the Photograph in a Goshuin Practice
A goshuin photograph serves a specific function: it’s a record of a visit.
The physical goshuincho — the actual paper, the actual ink — is irreplaceable. It has texture. It has the smell of ink. It was handed to you by a specific person at a specific time in a specific place, and all of that is embedded in the object in ways that no digital copy captures.
What the photograph does is different: it backs up the verifiable content of the stamp (what was written, which seals were used, what the overall composition looked like), and it carries location and time metadata that can be cross-referenced with other records. If the physical goshuincho is lost or damaged, the photographic record is what remains. If the physical book is intact, the photographs provide a searchable, portable complement — accessible without opening the book, shareable without risk to the original.
The photograph and the goshuincho are not in competition. They’re different layers of the same record. A well-shot photograph completes the record rather than replacing any part of it.
As a practice develops over years, the photographic archive becomes its own form of historical object. The earliest photographs — usually shot casually on a phone, with flash, in variable conditions — document how the practice began. Later photographs, shot with more care, show how the stamps themselves have evolved (seasonal variants, new designs, changes in how specific shrines present their stamps). The progression of photograph quality over years can be read as a kind of learning curve — evidence that the practice deepened, not just accumulated.
When you look back at photographs from five years ago, you’ll see what you didn’t know about shooting then. That’s useful information. It means the next five years of photographs will be better.
Summary
Five techniques that consistently improve goshuin photography:
| Technique | Key Point |
|---|---|
| 1. Natural light, no flash | Turn flash off permanently; use shade, overcast light, or a window |
| 2. Flat placement, overhead shot | Place on a stable surface; shoot from directly above with grid overlay |
| 3. Shoot at the shrine | Photograph immediately after receiving; integrate with app logging |
| 4. Background and composition | Use precinct surfaces; seasonal elements add temporal context |
| 5. Post-shoot adjustment | Correct brightness and white balance to match the original stamp |
None of this requires professional equipment or skill. It requires attention, which you’re already bringing to the act of collecting goshuin.
Next time you receive a stamp: turn off the flash, find a stone surface in the precinct, place the goshuincho flat, shoot from above, spend three minutes editing the brightness and color before uploading to your app. That’s the whole practice. It becomes fast. It becomes automatic. And the photographs it produces will still be legible records ten years from now.
Image Licenses
- goshuincho-five-shuin.jpg: “Goshuincho with five shuin” by Immanuelle, CC BY 4.0, via Wikimedia Commons
- goshuincho-on-bed.jpg: “Goshuincho on bed by Immanuelle” by Immanuelle, CC BY 4.0, via Wikimedia Commons
- goshuincho-displayed.jpg: “Displayed Goshuinchō” by Immanuelle, CC BY 4.0, via Wikimedia Commons
- isagawa-shuin.jpg: “Isagawa-jinja Shuin” by Immanuelle, CC BY 4.0, via Wikimedia Commons


